Monitoring is a best practice to grantee a reliable IT services, it help Ops engineers gain deep observability on how IT systems run, and is considered as a proactive maintenance. In this guide we take a look at Zabbix an open source monitoring solution, that has a lot of integrations we well know platform and hardware equipments.
What is Zabbix?
Zabbix is a distributed monitoring solution, its a set of open sources tools that help organizations monitor their IT infrastructure of any size, it’s based on master slave architecture,
A server that process and aggregates values received from agents, an agent is a service installed on the target you want to monitor, it collects metrics from system and it’s applications and report them back to server
Zabbix is a mature monitoring solution, it enable you to monitor any solution, for example you can monitor all major operating systems, common applications like web-servers databases and many more for a full list of what Zabbix can monitor please refer to the Zabbix Integrations.
In this guide we will install Zabbix Server, Zabbix Agent, I supporse you already have access to a database, another importent thing is
Zabbix Server Setup
In this guide we walkthough complete setup of Zabbix Server 6.0 LTS, in a Debian Linux, with 1Gib of RAM and 8Gib Disk storage,
Zabbix requires a database to persist the collected metrics and objects it supports both PostgreSQL and MariaDB/MySQL Databases.
In this guide I am assuming that you already have a MySQL or MariaDB database up and running.
Make sure you are logged in the debian server in which you will install zabbix server, and download the zabbix-6.0-realease-all package.
$ wget https://repo.zabbix.com/zabbix/6.0/debian/pool/main/z/zabbix-release/zabbix-release_6.0-4+debian10_all.debWhen download is finished install the package using dpkg this will install a the zabbix 6.0 LTS apt repositoy.
$ dpkg -i zabbix-release_6.0-4+debian10_all.debRun a apt update to get the latest package versions from the repository.
$ apt updateNow that our system packages version are up to date, we can proceed with installation of many packages that are required by zabbix to work.
$ apt install zabbix-server-mysql zabbix-frontend-php zabbix-apache-conf zabbix-sql-scripts zabbix-agentzabbix-server-mysqlis the server that support MySQL/MariaDB type of database,zabbix-frontend-phpis the front end web application that we are going to use to manage zabbix.zabbix-apache-confis Apache Web Server with configuration to run the zabbix-frontend-php component.zabbix-sql-scriptsare boostrapping SQL scripts used to create the initial database schema of tables…zabbix-agentis the agent that monitors zabbix server
Setup Database
in this section we are creating a database and user for Zabbix to use to persist data in the MySQL database.
Swich to your database instance and run the commend to login to Mysql db, after enter the password.
$ mysql -uroot -pmysql> create database zabbix character set utf8mb4 collate utf8mb4_bin;
mysql> create user zabbix@localhost identified by 'password';
mysql> grant all privileges on zabbix.* to zabbix@localhost;
mysql> set global log_bin_trust_function_creators = 1;
mysql> quit;Feel free to tweak configuration like password username and access network as you wish, but keep them because we will need them when we access Zabbix server.
For example you must change the @localhost if your database instance is not installed on same linux instance as your zabbix server with IP of the latter, to something like @192.168.1.100
Configure Zabbix Server
First thing to do after creating database and user in MySQL, is to run the bootsraping scripts.
From the Linux instance where you installed Zabbix server navigate to /usr/share/zabbix-sql-scripts/mysql/ and run the command
$ zcat server.sql.gz | mysql --default-character-set=utf8mb4 -uzabbix -p zabbixYou will get prompted to enter a password, enter the password you used to create database user,
please be patient because this step takes a little time longer to finish.
when you get your prompt back log back to the database and run the commend below
mysql> set global log_bin_trust_function_creators = 0;Now back in your zabbix server instance, edit file configuration file /etc/zabbix/zabbix_server.conf
DBHost=<ip|hostname>DBPassword=<database-password>if you use externel database use its IP or domain name, and database user password, after that restart services using systemd.
$ systemctl restart zabbix-server.service zabbix-agent.service apache2.service
$ systemctl restart zabbix-server.service zabbix-agent.service apache2.service
Now you can access http://<server-ip>/zabbix/.
You will be greated by the Zabbix login page, enter Admin in username and zabbix in password, I strongly recommend to change the Admin user’s password.
Congratulations you just setup your Zabbix server, You can now start monitoring other nodes, the next section is about Zabbix agent setup.
Zabbix Agent Setup
To monitor other targets the process is similar but simpler then Zabbix server installation.
First thing you need to access the node you want Zabbix to monitor, in this example we are monitoring a Debian Linux Virtual machine, access the machine and in your terminal session and run these commands.
$ wget https://repo.zabbix.com/zabbix/6.4/debian/pool/main/z/zabbix-release/zabbix-release_6.4-1+debian10_all.deb$ dpkg -i zabbix-release_6.4-1+debian10_all.deb$ apt updateNow we can install the agent package.
$ apt install zabbix-agentNext we need the hostname of the machine to conifgure the agent, copy the value
$ hostname -fNext, use your favorite editor to open zabbix agent configuration file
$ vim /etc/zabbix/zabbix_agentd.confNext, find replace the defaults values of Server & Hostname by appropriate values,
Server=<Zabbix Server IP|Domain name>
Hostname=<hostname>
Restart the agent to load the new configuration changes.
$ systemctl restart zabbix-agent.serviceGo back to web management interface and add a new host
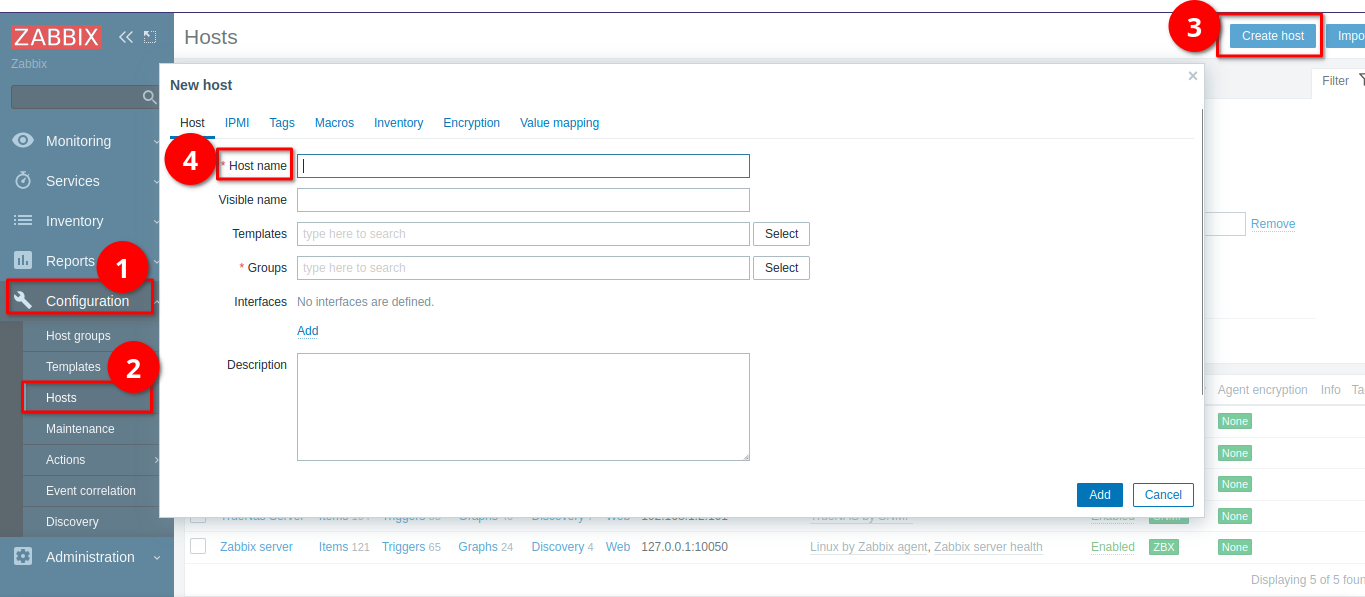
In this interface section click on Add, choose Agent, and then fill in the IP address of the target host that you just installed agent in. Now it’s time to choose a template.
Templates are a collection of predefined metrics, alarms, and discovery rules that you agent collects, there are many available templates and you can also customize them to include even more or create to new ones.
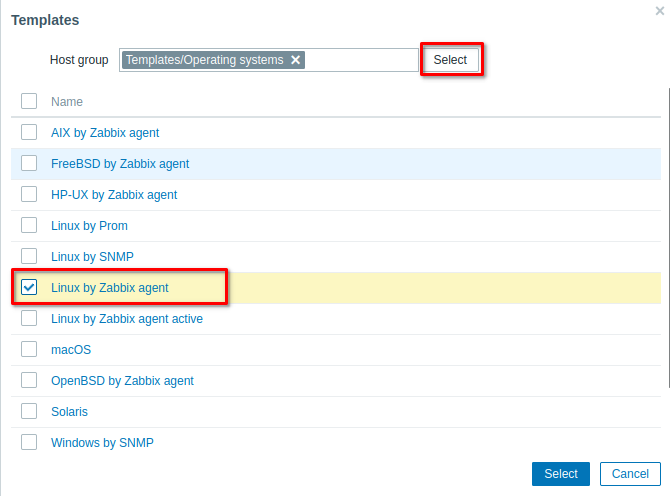
We choose Templates/Operating Systems/Linux by Zabbix Agent because we are monitoring a Linux target
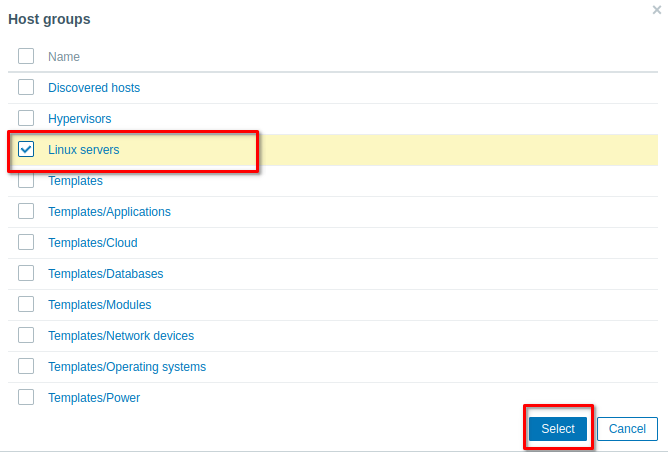
add the host group by choosing Linux Server.
And finaly give your host a visible usely, it’s recommend to name it the main serviceit provides like database server… and hit Add to create the host
After creating the host, it’s should look something like

if you see a red tag in the status or availability columns it means that you have a problem connecting the server and agent, double check the steps above or refer to the Troubleshooting Section.
Congratulations you just setup Zabbix server and agents to monitor targets, this is an overview, and there are many things to explore, Thank you for reading and stay tuned for more content.
Troubleshooting
- Connectivity : Make sure that your zabbix server can communicate with targets and the databases, practical test is to use
pingandtelnet <ip> <port>to test if there are connectivity isseurs. - Firewall : Double check if you have rules blocking your components from communicating
- Logs : Check Zabbix Server/Agent log files under
/var/log/zabbix/directory, another handy command is to watch logs usingtail -f zabbix_server.logthis will follow the log file and will give your real time monitoring of what is happening. - DNS : if you used domain names instead of IP address make sure each node is able to resolve the domain. using a simple
pingcommand will tell you if you have DNS resolution problems.