
Vagrant is an open source tool for building complete development environments, it is easy ti use and focus a lot on automation, and simplify virtual environment management.
it abstracts managing your virtual environments infrastructure (Virtual machines & Containers) through using CLI tool and declarative configuration files, this way it’s more efficient and portable to work with and ship virtual environments.
Why learn about another tool like Vagrant? : Instead of clicking several times the UI of your favorite hypervisor management console, you can use vagrant CLI tool to interact with it through API calls. it’s fast, you can also use it to automate provision programmatically, you can benefit from Vagrant registry ready to use images, which covers almost every popular application (databases,os templates,tech stacks, virtual appliances), and finally it’s Infrastructure as code nature makes it easy to track and audit your environment changes and evolution.
You can download pre-build machine images (called boxes) from vagrant registry and use them to build your own environment, there are many ready images for your applications like web servers (Nginx,Apache,Caddy), operating systems(Ubuntu RedHat…), and Databases (Oracle, MySQL…), if you didn’t find your preferred environment you can still build it from scratch and share it to the registry. these images come in many format, each provider (Hypervisor) accepts a format.
in the next section we talk about what are providers, and how Vagrant integrate with them.
Providers
Vagrant runs as automation layer on top of popular virtualization platform. which means that vagrant doesn’t provide a virtualization technology instead it relays on existing popular virtualization hypervisors, by default vagrant uses Virtualbox as its provider.
Providers are virtualization/containerization platforms installed in your host machine. Vagrant integrates with providers through API calls, vagrant has support for most popular virtualization platform such as VMware, Docker…
Here is a list of supported providers
- Virtual Box [ Default ]
- Hyper-V
- Docker
- VMware
You can find other providers like KVM,libvirt…,in community, as well as you can create your own custom provider.
Boxes
Boxes are the package format of vagrant environments, essentially boxes are pre-configured VM with a specified OS and system and user packages, boxes are just a fancy name for machine images or OS templates
there is two type of boxes,
- Official Boxes released and maintained by HashiCorp.
- Community Boxes released by the vagrant community.
All of these boxes are publicly available at Vagrant Cloud Registry. You can download, add and share your own customized boxes from and on Vagrant Cloud.
Box registries in Vagrant cloud support multiple format for multiple providers, and also versioning. you can pick and choose which version and which provider are suitable for your workload.
Vagrantfile
Vagrantfile is a text file written in Ruby programming language, all of your virtual environment configuration and specification are recorded in Vagrantfile and preferably stored and versioned in a git repository.
The primary function of a Vagrantfile is to declare the specification of environment, like number of vCPUs, Memory, Hard Disk, Network interface, and configuration like operating system template, bootstrapping, config files and packages required for your project.
By defining your environment as code you get to benefit from, software development tools and practices, like collaboration, version control systems like git, and also enables automation because next time you need to provision the same environment in for production scenario , you just need to run a simple command, or run vagrant in a pipeline.
Here is an example of a Vagrant file
Vagrant.configure("2") do |config| config.vm.box = "ubuntu/xenial64"endThe config.vm.box is the only parameter required in Vagrant file, it defines what base image the project is using.
this is the simplest form of a vagrant file, you can do more advanced action in a vagrant file like configuring networking, configuring provider, provisioning with scripts, and Ansible.
for more information check out Resources Section
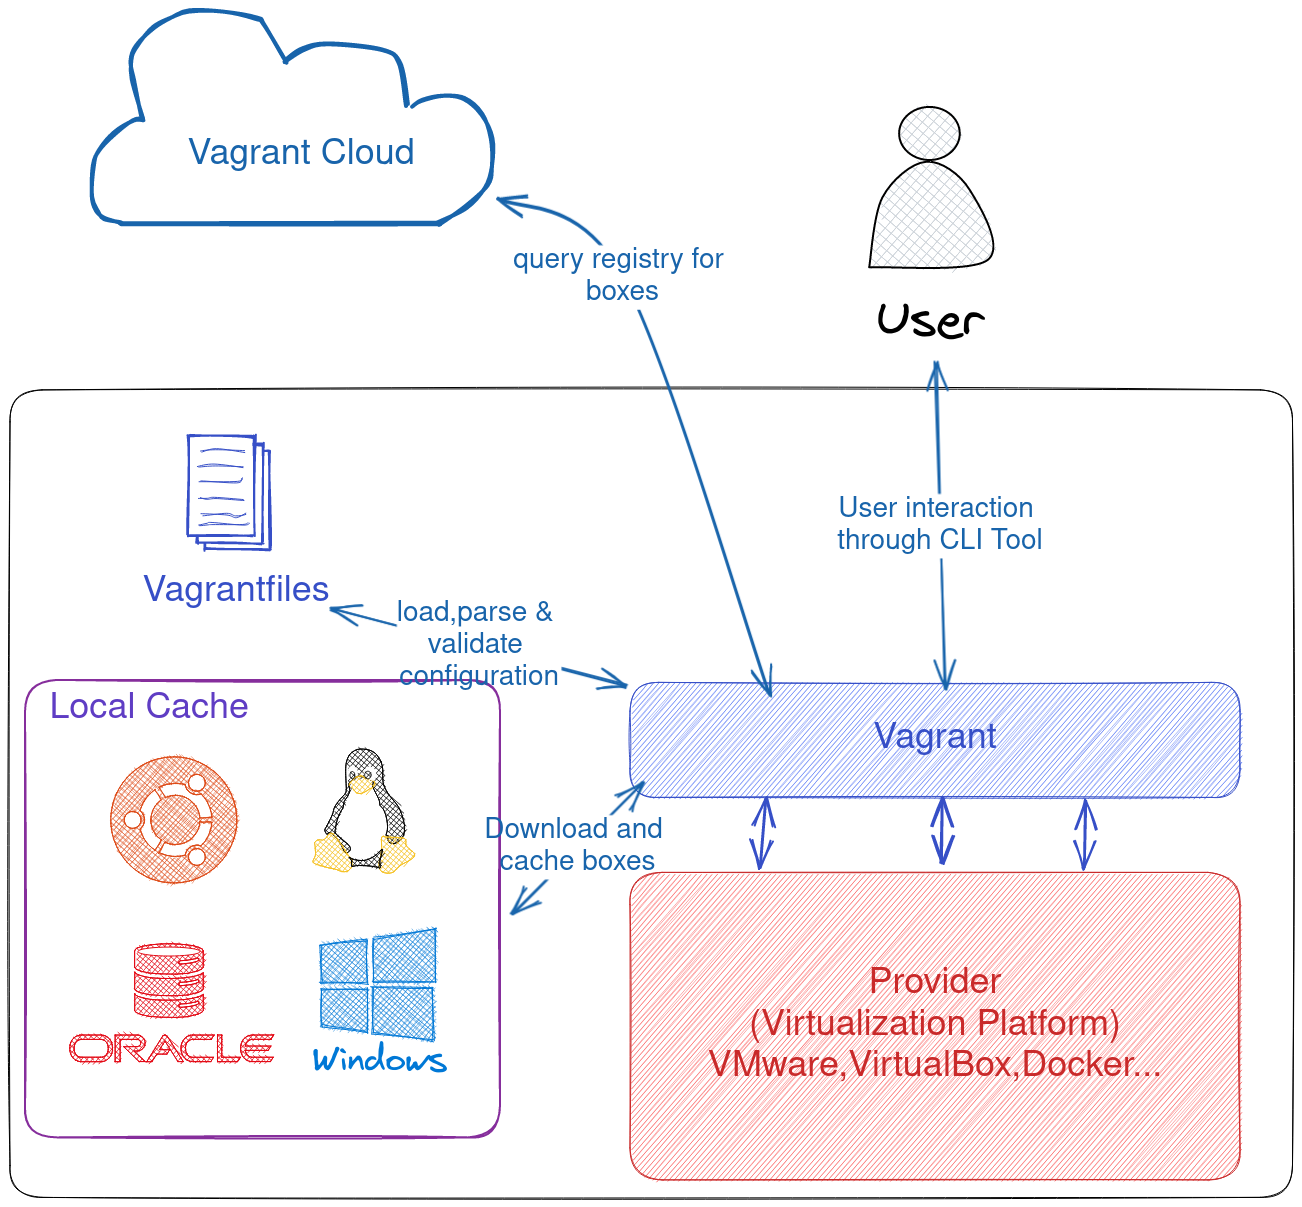
Vagrant Architecture
in this section I have tried to summarize all the discussed concepts above to give a general overview of what is vagrant, and what are its capabilities, please note that this is just a simple representation of Vagrant and doesn’t includes all of it’s features because it’s out of scope of today’s talk.
Installing Vagrant
vagrant support major operating systems, and CPU architectures, you can find the step by step instructions for your environment in the Resources
After successfully installing vagrant, now we see what it looks like working with vagrant from day to day, next section covers the vagrant main commands and what
Working with Vagrant
in this section we see how to work with vagrant, through out the section, and when you are doing a hand-on please make sure you are in the working directory as the Vagrantfile.
The init command, giving an box identifier, generates Vagrantfile template, with the specified box id, and initialized the current directory for vagrant(creates a hidden directory .vagrant)
$ vagrant init "ubuntu/xenial64"The up command, is how we start the environment, in case of a fresh project vagrant scans the current directory for vagrant file, and checks whether the box is locally cached or not, if no it goes to the registry and download it if yes it reads the vagrant file and provision a virtual environment using that box.
$ vagrant upthe halt command stop/hibernate the running environment, this is very useful when you are not using the environment but still want to keep it for later use.
$ vagrant haltto check the current state of the environment
$ vagrant statusTo access the environment, you can use standard remote access protocols like SSH and powershell, vagrant abstract the process of preparing connection parameters and loading the necessary secret keys by following wrapper command.
$ vagrant ssh
# or for windows environments
$ vagrant powershell
When you are done using the environment and you decided you longer going to need it, you can delete it, please note that all of the data generated and stored in the environment will be lost after executing the following command so make sure you backup all of the important data.
$ vagrant destroySometimes, when you are working with multiples vagrant environment, it’s very convenient to want to know what is the status of everyone
$ vagrant global-statusYou can manage and view all your downloaded boxes
$ vagrant box <subcommand>I think we covered up the basics of vagrant, it’s an awesome tool and personally use it a lot in testing solution and testing scripts and applications, there is more to vagrant that is covered in this guide you can refer to the documentation for more details,tutorials and concepts about vagrant,
That’s it we reach it the end of this overview I hope I wasn’t dull and boring and I’d like to thank you for going through this article. if you liked this kind of content you can drop a follow for more.