
In this guide we will explore how we can enable Infrastructure as Code for Proxmox VE using Terraform, we start looking at how we can connect Terraform with Proxmox VE, after that we deploy a simple virtual machine in Proxmox using configuration Language HCL. in this tutorial I assume that you have Terraform binary installed on your machine, and a reachable Proxmox Server.
Proxmox Virtual Environment
Proxmox VE is an enterprise-grade virtualization platform, it’s an open source project, based on Qemu & KVM Hypervisor which is deeply supported in the Linux Kernel. Proxmox solves common virtualization challenges like VM backups, Migration, HA, Clustering, Identity Federation, and many more, it has support for KVM/QEMU Virtual Machines and LXC Containers, it comes with a friendly-looking web management interface and has a set of CLI management tools. The installation is smooth you have to go to this website and download the ISO, then boot from it.
Now that we saw a brief definition about Proxmox VE let’s see how we can manage it using Terraform.
Creating User and Role for Terraform
Fisrt thing to do is to create a user for Terraform in Proxmox,you can use the CLI or the web management console, in this example I will use the CLI, but the process is similar in Web Interface you just need to go to the Datacenter > Privileges > {Users,Roles}
Login to into any of your proxmox nodes via SSH,make sure you are logged as root or an administrative user that can execute the sudo command.
$ pveum user add terraform-prov@pve --password <password>In this step, we added a user named terraform-prov using the proxmox authentication realm which makes our user identifiable in all Proxmox nodes and we provided a strong password.
$ pveum role add Terraform -privs "VM.Allocate VM.Clone VM.Config.CDROM VM.Config.CPU VM.Config.Cloudinit VM.Config.Disk VM.Config.HWType VM.Config.Memory VM.Config.Network VM.Config.Options VM.Monitor VM.Audit VM.PowerMgmt Datastore.AllocateSpace Datastore.Audit Pool.Allocate Pool.Audit"In this step, we defied a role for Terraform user to assume,roles is proxmox are a set of privileges that can users or group assume, you can pick and choose which privileges you want Terraform to have, in example above I have included all of privileges related to VM,Datastore (Disk Volumes) and Pools.
$ pveum aclmod / -user terraform-prov@pve -role TerraformLastly, we assume the user terraform-prov the Terraform Role on / which give the user full management on VMs,Volumes and Pools across all Proxmox nodes. If you want to restrict Terraform to manage a specific node you can replace / with /nodes/<node_name>.
After we created the user we can login and test permissions.
Generating API Token
Now we generate the token that Terraform provider will leverage to make authorized API calls to back-end server. Assuming you are logged in to Proxmox you can go to Datacenter and Scroll to API Tokens.
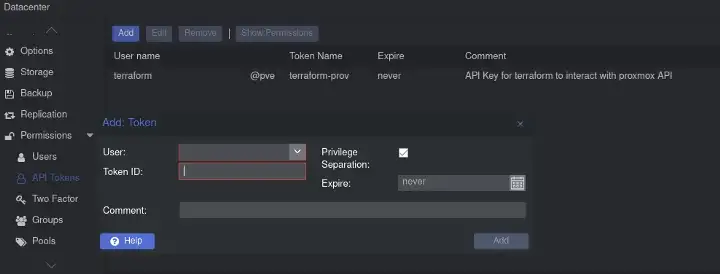
Add API Token Proxmox Web Interface
As you see I have already generated my token, First you have to choose the user we created terraform-prov and give the token a preferred ID, You can also expire the token to enhance security or meet compliance rules.
#1 Note : The Token ID and Secret Token are displayed once if you quiet the popup window you will not be able to retrieve them, you will need to create another one.
#2 Note : Secret Token and Token ID are sensitive data, You must treat them as any private password or secrets you have. as best practice you can store them in a Password Manager or encrypted Database.
Write, Plan and Apply
In this section, we will use Terraform Provider for Proxmox by Telmate, but first we need to create a working directory for configuration files. and create files as shown below.
├── main.tf├── outputs.tf├── providers.tf├── terraform.tf└── variables.tfFollowing Terraform best practices, This structure is consistent across all Terraform modules.
Staring with terraform.tf in which we define the required version for terraform and the provider definition.
# terraform.tf fileterraform { required_version = ">= 1.0.0" required_providers { proxmox = { source = "Telmate/proxmox" version = "~> 2.9.11" # Current version may change } }}Now that we specified the providers we will instruct Terraform to go and download the provider.
in you terminal, make sure you are in the working directory where your .tf files reside, run the command
$ terraform initAfter downloading the provider is done, go to the providers.tf and past the code below, we must configure terraform provider to point to Proxmox API Backend, and to provide the token we just generate, and some properties you can read about them all in the Terraform Registry.
provider "proxmox" { pm_api_url = "http://<proxmox_hostname>:8006/api2/json" # Pro Tip : Never store your creds on Terraform Configuration files # that can or may be commited to VCS # Pro Tip : Use either Env Variables or git-ignored *.auto.tfvars files pm_api_token_id = var.proxmox_token_id pm_api_token_secret = var.proxmox_token_secret # Disable TLS (not recommanded for Production envirement) pm_tls_insecure = true # Define number of parrallel tasks that proxmox can handle. pm_parallel = 10}As mentioned in comments, for security concerns we should not put tokens and secrets as plain text in configuration files that will eventually end up check up in version control systems like Git and in public repositories.
Instead we can use OS environment variables
export PM_API_TOKEN_ID="terraform-prov@pve!mytoken"export PM_API_TOKEN_SECRET="afcd8f45-acc1-4d0f-bb12-a70b0777ec11"or create a special file that end with .auto.tfvars in working directory, Terraform will load variables automatically and we can reference them using the var.<variable_name> keyword.
proxmox_token_id = "terraform@pve!terraform-prov"proxmox_token_secret = "afcd8f45-acc1-4d0f-bb12-a70b0777ec11"However make sure this file do not end up committed into VCS by ignoring it, for example if you use git. you can use this one-liner.
$ echo "file_name.auto.vars" >> .gitignoreNow let’s test if everything is set correctly by running the commend
$ terraform plan --refresh-onlythe command above will connect to the proxmox server and refresh the state of Terraform, this is just a hacky way of testing connection and authorization between Terraform and Proxmox, If you got any errors just double check the steps above, now that we are successfully connected Terraform to Proxmox backend we can start writing Infrastructure as Code.
resource "proxmox_vm_qemu" "pve_vm" { name = "VM" target_node = "Node to create the VM on" iso = "<pve-storage-id>:iso/<filename>.iso" memory = 4096 cores = 2 disk { storage = "local-lvm" type = "scsi" size = "10G" }}In the example above we declare a virtual machine with 4GiB Ram, 2 cores and a 10Gib local hard disk. for iso parameter it depends on the storage setup and where you store your iso files.
Let’s generate an execution plan to see what will change in the infrastructure
$ terraform planIf everything seems, let’s proceed to the next step and apply the changes.
$ terraform applyif you want to clean up all the Terraform managed resources.
$ terraform destroyBonus Tip : You can import existing VMs to Terraform State using import
$ terraform import [options] [node]/qemu/[vmId]Conclusion
In this guide, we saw how we can setup Terraform with Proxmox VE securely, we demonstrated the concept of Infrastructure as Code with a simple configuration file for a single VM. With Terraform we can manage any Platform as long as it has well documented API and a provider, Thank you for reading, and stay tuned for more content on Automation,Infrastructure as Code and Cloud Computing.